Linux
Ubuntu24安装
配置
- 笔记本型号 : 戴尔游匣
- 硬盘 : 128G SSD(已安装windows10,剩余43G) + 1T HDD(剩余300G)
- OS : windows 10 企业版 LTSC
- CPU : Intel Core i7 2.8GHz 4核8线程
方案
- windows 10 继续保留在128G的SSD
- ubuntu 24 / 分区和 /boot分区挂在SSD上面提速,/home分区挂在HDD(资料多)
步骤
1.关闭 Windows 快速启动:
控制面板 → 电源选项 → 选择电源按钮功能 → 关闭快速启动
2.关闭 Windows 的“休眠”(很关键)
powercfg -h off
3.使用DiskGenius将1T HDD的动态磁盘无损转换为基本磁盘
4.压缩128G的SSD,分出41G的空间;压缩1T的HDD,分出330G的空间

5.制作启动盘
- 下载Ventoy
- 下载Ubuntu24
- 打开Ventoy,点击 选项 → 分区样式 → GPT,安装Ventoy到U盘
6.将Ubuntu24 ISO复制到U盘中
7.重启电脑,F12设置USB启动,选择Ubuntu系统安装
8.分区配置
| 挂载点 | 类型 | 大小 | 分配 | 说明 |
|---|---|---|---|---|
/ (含/boot) |
ext4 | 60–80 GB | 33G | 系统核心 |
swap |
swap | 4–8 GB | 8G | 交换分区 |
/home |
ext4 | 剩余全部 | 330G | 个人数据 |
GRUB 引导程序安装位置:一定安装到:128GB SSD 的 EFI 分区,和Windows同一个分区(通常是 nvme0n1p1 或 sda1)
不要改为 HDD,否则 Windows 引导会无法显示。
Ubuntu 安装程序会自动识别,可确认一下:
-
引导器位置:与 Windows 相同的 EFI 分区
-
安装完成后 → 会自动生成双系统菜单
9.BIOS 设置
-
进入BIOS(F12),启用UEFI,关闭Legacy
-
第一启动设置Ubuntu,开机进入Ubuntu的GURB,两个系统均可以启动
Ubuntu
Windows Boot Manager
Ubuntu GNU GRUB 启动项编辑
-
编辑/etc/default/grub
sudo nano /etc/default/grub常用配置:
配置项 作用 GRUB_DEFAULT=0 默认第 0 个菜单项(从 0 开始计数) GRUB_TIMEOUT=5 启动菜单等 5 秒 GRUB_TIMEOUT_STYLE=menu 强制显示菜单 GRUB_DISABLE_OS_PROBER=false 让 GRUB 自动检测 Windows(Ubuntu22+ 默认禁用) -
更新GRUB
sudo reboot
Windows设置Linux启动
Linux目录
| 目录 | 用途 | 是否推荐 |
|---|---|---|
/opt/软件名 |
第三方手动安装软件(最佳选择) | ⭐⭐⭐⭐⭐ |
/usr/local/ |
本地编译安装的软件 | ⭐⭐⭐⭐ |
~/bin |
当前用户的脚本和工具 | ⭐⭐⭐⭐ |
/usr/bin |
系统软件(apt 管理) | ❌ 不要放 |
/root |
root 专用,不适合软件放置 | ❌ |
VMware® Workstation 12 Pro 安装 centos7


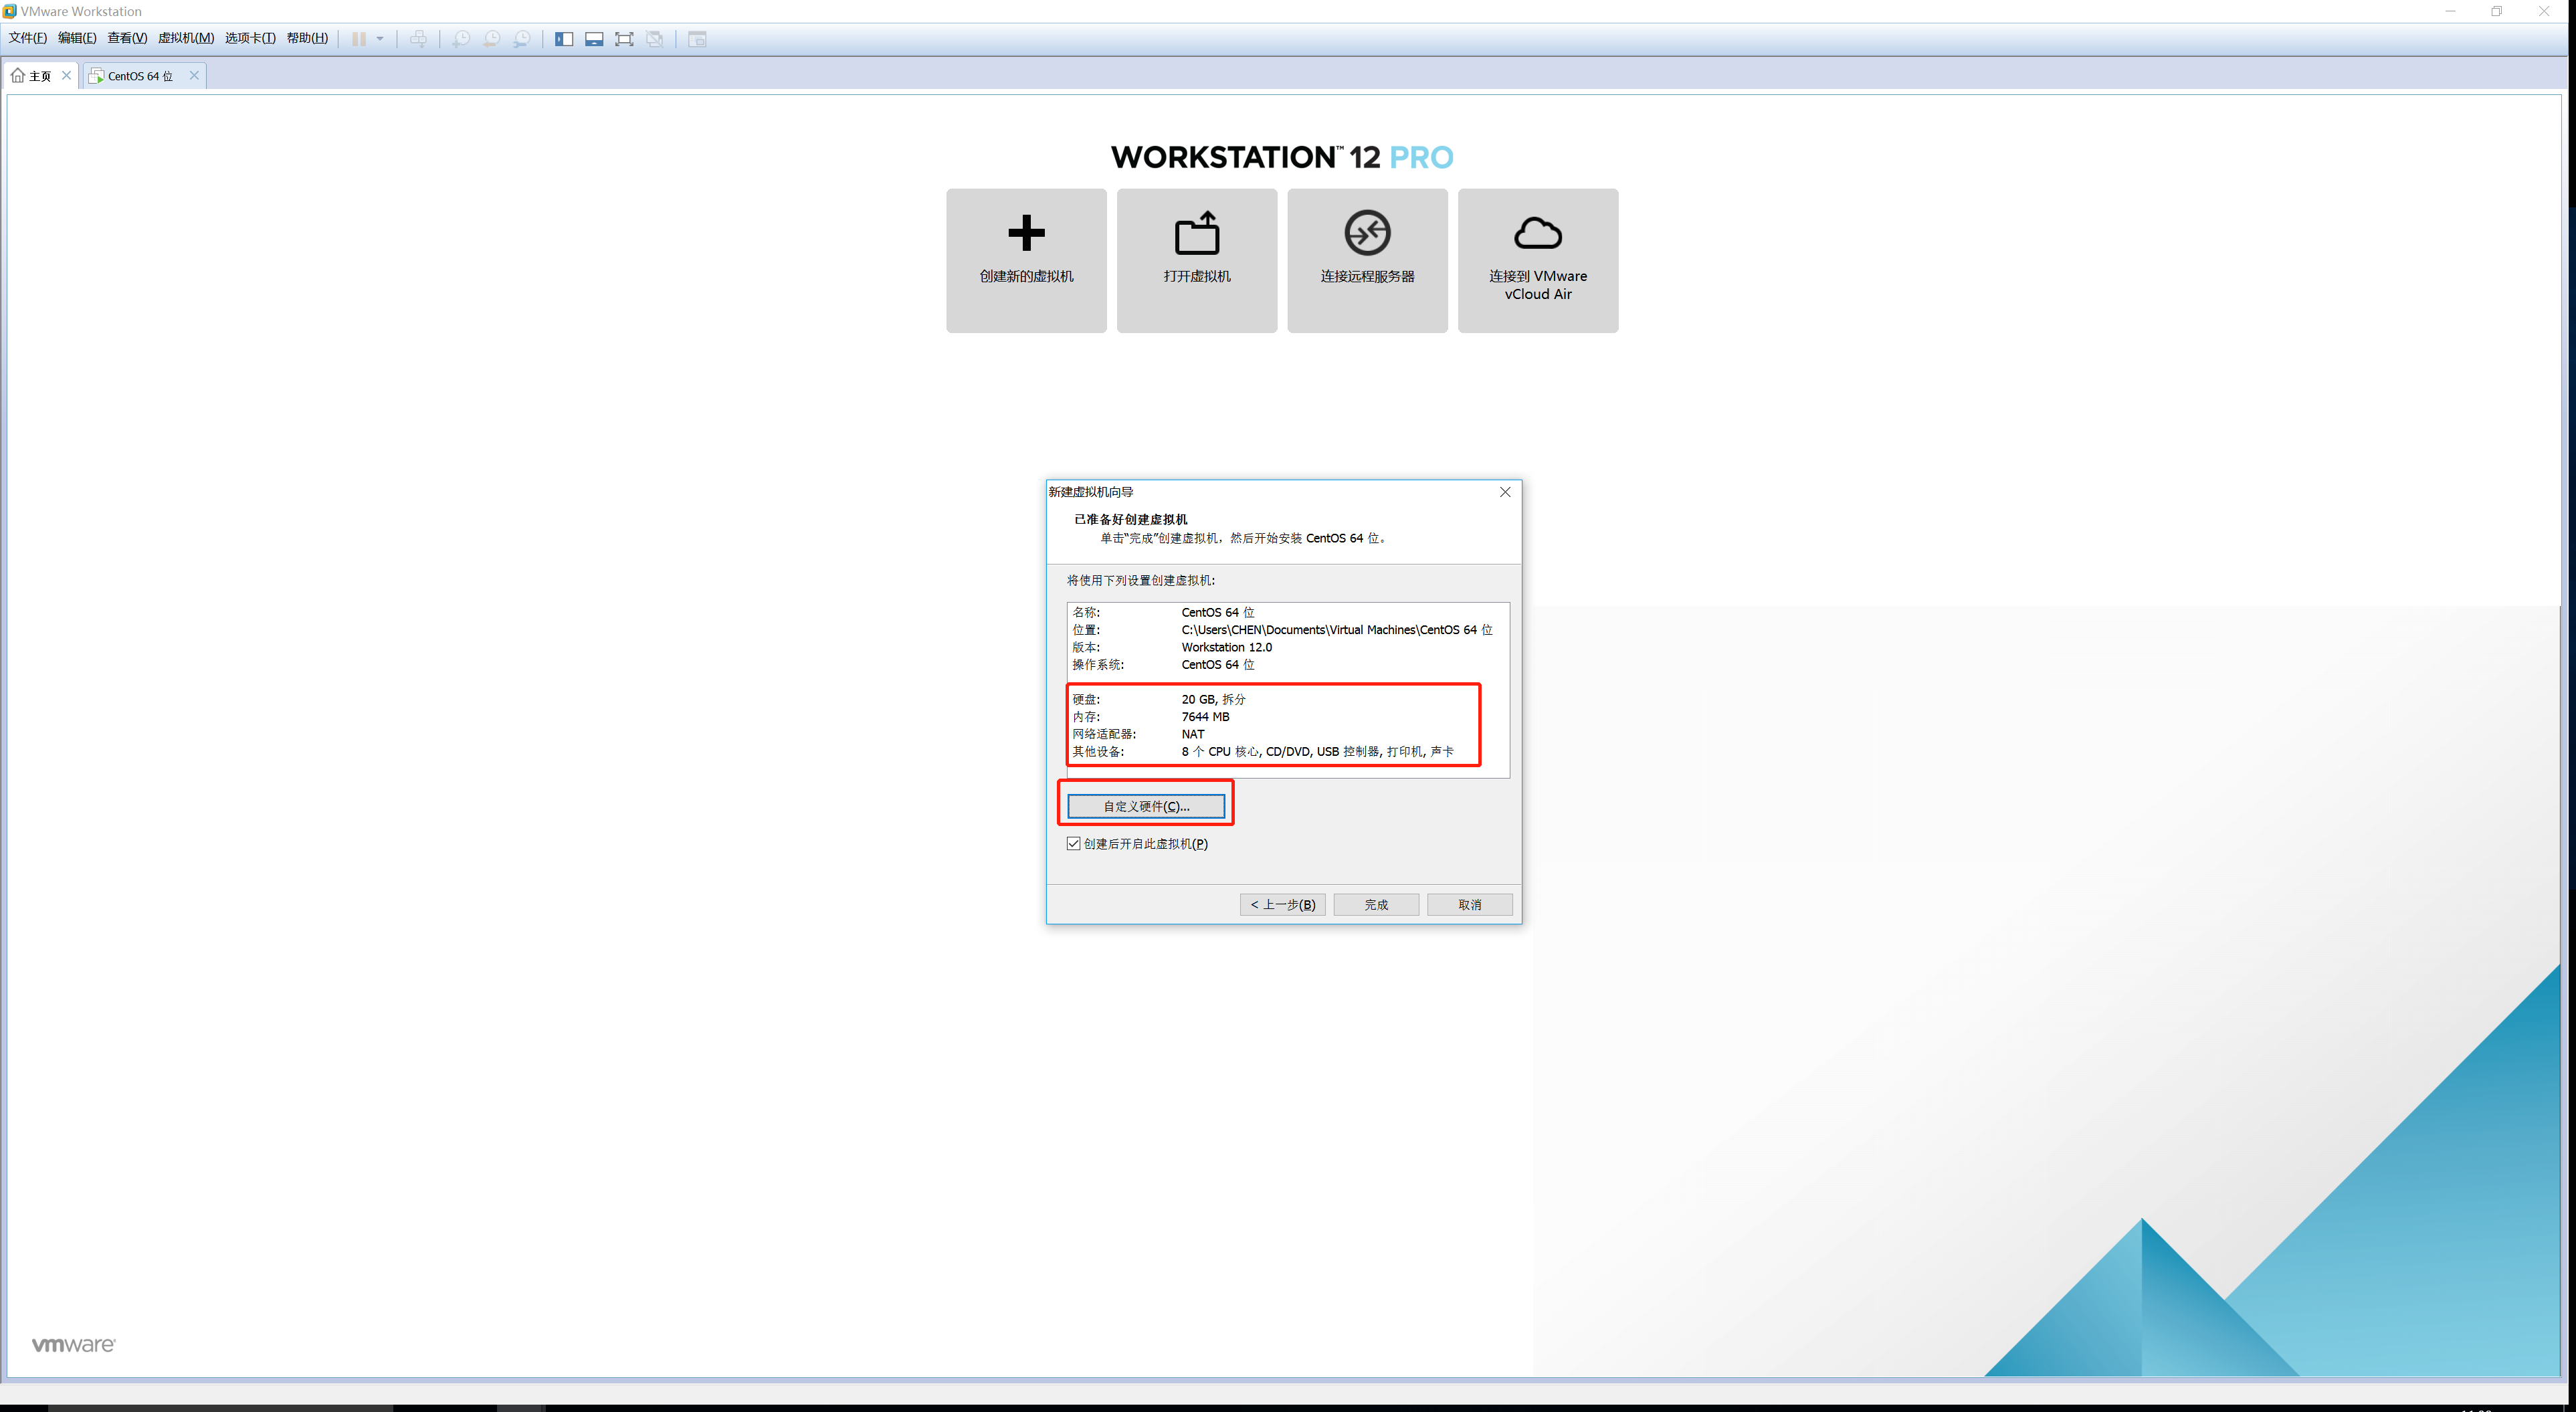
VMware Censtos7 网络设置
一 查看vm nat网络配置


二 配置window VM虚拟网卡


三 配置centos网络配置
- 备份网络配置文件
cp ifcfg-ens33 ifcfg-ens33-bnk
- 修改配置文件
vi /etc/sysconfig/network-scripts/ifcfg-ens33
YPE=Ethernet
BOOTPROTO=static		#设置静态ip地址
DEFROUTE=yes
PEERDNS=yes
PEERROUTES=yes
IPV4_FAILURE_FATAL=no
IPV6INIT=yes
IPV6_AUTOCONF=yes
IPV6_DEFROUTE=yes
IPV6_PEERDNS=yes
IPV6_PEERROUTES=yes
IPV6_FAILURE_FATAL=no
IPV6_ADDR_GEN_MODE=stable-privacy
NAME=ens33
UUID=83ade40d-acdf-4b59-8460-1576a8078b33
DEVICE=ens33
ONBOOT=yes		#开机自动联网

# static config
IPADDR=192.168.121.1 	#固定ip地址
NETMASK=255.255.255.0	#子网掩码
GATEWAY=192.168.121.2	#默认网关
- 使网络配置生效
service network restart
JDK安装
一 下载jdk
下载:jdk-11.0.13_linux-x64_bin.tar.gz
二 用WinSCP上传到centos7服务器上
三 新建目录
mkdir 【目录】
mkidr /usr/local/java
四 解压文件
tar -zxvf -C 【指定目录】
tar -zxvf jdk-11.0.13_linux-x64_bin.tar.gz -C /usr/local/java/
五 添加环境变量
vim /etc/profile 文件最后加入环境变量配置(jdk11集成了jre,不需要配置jre)
- cp /etc/profile /etc/profile-bnk 备份配置文件
- vim /etc/profile
- 【i】进入编辑模式
- 【Shift+Ins】复制环境变量配置
- 【Esc】退出编辑模式
- 【:wq】保存/ 【:q!】退出不保存
# java 环境变量配置
export JAVA_HOME=/usr/local/java/jdk-11.0.13
export PATH=$JAVA_HOME/bin:$PATH
export JAVA_HOME=/usr/local/jdk1.8.0_121
export PATH=$JAVA_HOME/bin:$PATH
export CLASSPATH=.:$JAVA_HOME/lib/dt.jar:$JAVA_HOME/lib/tools.jar:$JAVA_HOME/jre/lib/rt.jar
vim /etc/profile


if [ $UID -gt 199 ] && [ "`/usr/bin/id -gn`" = "`/usr/bin/id -un`" ]; then
    umask 002
else
    umask 022
fi

for i in /etc/profile.d/*.sh ; do
    if [ -r "$i" ]; then
        if [ "${-#*i}" != "$-" ]; then
            . "$i"
        else
            . "$i" >/dev/null
        fi
    fi
done

unset i
unset -f pathmunge

# java 环境变量配置
export JAVA_HOME=/usr/local/java/jdk-11.0.13
export PATH=$JAVA_HOME/bin:$PATH
六 配置立即生效
source /etc/profile
source /etc/profile
七 查看java版本
java -version
java -version
java version "11.0.13" 2021-10-19 LTS
Java(TM) SE Runtime Environment 18.9 (build 11.0.13+10-LTS-370)
Java HotSpot(TM) 64-Bit Server VM 18.9 (build 11.0.13+10-LTS-370, mixed mode)
JDK卸载
一 检查安装的jdk
java -version
[root@localhost bin]# java -version
java version "1.8.0_121"
Java(TM) SE Runtime Environment (build 1.8.0_121-b13)
Java HotSpot(TM) 64-Bit Server VM (build 25.121-b13, mixed mode)
二 检查jdk安装目录
which java
[root@localhost bin]# which java
/usr/local/jdk1.8.0_121/bin/java
三 删除安装文件
rm -ef [文件目录]
rm -rf /usr/local/jdk1.8.0_121/
四 删除环境变量配置
vim /etc/profile
[root@localhost local]# vim /etc/profile

export JAVA_HOME=/usr/local/jdk1.8.0_121
export PATH=$JAVA_HOME/bin:$PATH
export CLASSPATH=.:$JAVA_HOME/lib/dt.jar:$JAVA_HOME/lib/tools.jar:$JAVA_HOME/jre/lib/rt.jar
五 检查java命令
java -version
[root@localhost local]# java -version
bash: java: command not found...
[root@localhost local]# which java
/usr/bin/which: no java in (/usr/local/jdk1.8.0_121/bin:/usr/local/sbin:/usr/local/bin:/usr/sbin:/usr/bin:/root/bin)
六 卸载自带的jdk
查询:
rpm -qa |grep java rpm -qa |grep jdk rpm -qa |grep gcj 卸载, 批量卸载所有带有Java的文件 关键字是java rpm -qa | grep java | xargs rpm -e --nodeps[root@localhost local]# rpm -qa|grep java
tzdata-java-2016g-2.el7.noarch
python-javapackages-3.4.1-11.el7.noarch
[root@localhost local]# rpm -qa | grep java | xargs rpm -e --nodeps
[root@localhost local]# rpm -qa|grep java
[root@localhost local]# rpm -qa|grep java
[root@localhost local]# rpm -qa|grep jdk
[root@localhost local]# rpm -qa|grep gcj
Chrome安装
一 下载 rpm文件
wget https://dl.google.com/linux/direct/google-chrome-stable_current_x86_64.rpm
二 安装
sudo yum localinstall google-chrome-stable_current_x86_64.rpm
三 启动
Applications → Internet → Google Chrome ):elasticsearch 安装
参考:
https://www.cnblogs.com/shanfeng1000/p/14684295.html
https://pdai.tech/md/db/nosql-es/elasticsearch-x-install.html
一 卸载centos自带jdk;安装ELK对应版本的jdk
二 下载elasticsearch nojdk版本
elasticsearch 自带jdk版本
三 解压安装
tar -zxvf
四 root启动
使用root账号会报错。
 cd /usr/local/elasticsearch-7.17.1/bin
./elasticsearch
...
Caused by: java.lang.RuntimeException: can not run elasticsearch as root
...
五 创建非root账号 chen,非root启动
useradd chen
passwd chen

Changing password for user elasticsearch.
New password:
BAD PASSWORD: The password contains the user name in some form
Retype new password:
passwd: all authentication tokens updated successfully.
报错信息:
[root@localhost bin]# su chen
[chen@localhost bin]$ cd /usr/local/elasticsearch-7.17.1/
[chen@localhost elasticsearch-7.17.1]$ cd /bin/
[chen@localhost bin]$ cd /usr/local/elasticsearch-7.17.1/bin/
[chen@localhost bin]$ ./elasticsearch
Exception in thread "main" SettingsException[Failed to load settings
from /usr/local/elasticsearch-7.17.1/config/elasticsearch.yml];
nested: AccessDeniedException[/usr/local/elasticsearch-7.17.1 /config/elasticsearch.yml];
权限不够
六 分配权限
[root@localhost elasticsearch-7.17.1]# chown -R chen /usr/local/elasticsearch-7.17.1/
[root@localhost elasticsearch-7.17.1]# mkdir -p /data/es
[root@localhost elasticsearch-7.17.1]# chown -R chen /data/es/
[root@localhost elasticsearch-7.17.1]# mkdir -p /var/log/es
[root@localhost elasticsearch-7.17.1]# chown -R chen /var/log/es/
七 修改 日志配置
[root@localhost elasticsearch-7.17.1]# vim /usr/local/elasticsearch-7.17.1/config/elasticsearch.yml
# ----------------------------------- Paths ------------------------------------
#
# Path to directory where to store the data (separate multiple locations by comma):
#
path.data: /data/es
#
# Path to log files:
#
path.logs: /var/log/es
八 启动报错
ERROR: [3] bootstrap checks failed. You must address the points described in the following [3] lines before starting Elasticsearch.
bootstrap check failure [1] of [3]: max file descriptors [4096] for elasticsearch process is too low, increase to at least [65535]
bootstrap check failure [2] of [3]: max virtual memory areas vm.max_map_count [65530] is too low, increase to at least [262144]
bootstrap check failure [3] of [3]: the default discovery settings are unsuitable for production use; at least one of [discovery.seed_hosts, discovery.seed_providers, cluster.initial_master_nodes] must be configured
* soft nofile 65535
* hard nofile 65535
* soft nproc 65535
* hard nproc 65535
vm.max_map_count=262144
使配置生效
sysctl -p
discovery.seed_hosts:集群节点列表,每个值应采用host:port或host的形式(其中port默认为设置transport.profiles.default.port,如果未设置则返回transport.port)
discovery.seed_providers:集群节点列表的提供者,作用就是获取discovery.seed_hosts,比如使用文件指定节点列表
cluster.initial_master_nodes:初始化时master节点的选举列表,一般使用node.name(节点名称)配置指定,配置旨在第一次启动有效,启动之后会保存,下次启动会读取保存的数据
https://www.elastic.co/guide/en/elasticsearch/reference/current/settings.html:
# ======================== Elasticsearch Configuration =========================
#
# NOTE: Elasticsearch comes with reasonable defaults for most settings.
#       Before you set out to tweak and tune the configuration, make sure you
#       understand what are you trying to accomplish and the consequences.
#
# The primary way of configuring a node is via this file. This template lists
# the most important settings you may want to configure for a production cluster.
#
# Please consult the documentation for further information on configuration options:
# https://www.elastic.co/guide/en/elasticsearch/reference/index.html
#
# ---------------------------------- Cluster -----------------------------------
#
# Use a descriptive name for your cluster:
# 集群名称
cluster.name: cluster-name
#
# ------------------------------------ Node ------------------------------------
#
# Use a descriptive name for the node:
# 结点名称
node.name: node-name
#
# Add custom attributes to the node:
#
#node.attr.rack: r1
#
# ----------------------------------- Paths ------------------------------------
#
# Path to directory where to store the data (separate multiple locations by comma):
# 数据路径
path.data: /data/es
#
# Path to log files:
# 日志路径
path.logs: /var/log/es
#
# ----------------------------------- Memory -----------------------------------
#
# Lock the memory on startup:
#
#bootstrap.memory_lock: true
#
# Make sure that the heap size is set to about half the memory available
# on the system and that the owner of the process is allowed to use this
# limit.
#
# Elasticsearch performs poorly when the system is swapping the memory.
#
# ---------------------------------- Network -----------------------------------
#
# By default Elasticsearch is only accessible on localhost. Set a different
# address here to expose this node on the network:
# 启动地址,如果不配置,只能本地访问
network.host: 0.0.0.0
#
# By default Elasticsearch listens for HTTP traffic on the first free port it
# finds starting at 9200. Set a specific HTTP port here:
#默认端口
#http.port: 9200
#
# For more information, consult the network module documentation.
#
# --------------------------------- Discovery ----------------------------------
#
# Pass an initial list of hosts to perform discovery when this node is started:
# The default list of hosts is ["127.0.0.1", "[::1]"]
# 结点列表
discovery.seed_hosts: ["127.0.0.1"]
#
# Bootstrap the cluster using an initial set of master-eligible nodes:
# 初始化,master节点的选举列表
cluster.initial_master_nodes: ["node-name"]
#
# For more information, consult the discovery and cluster formation module documentation.
#
# ---------------------------------- Various -----------------------------------
#
# Allow wildcard deletion of indices:
#
#action.destructive_requires_name: false
# 不获取官网最新ip的GEO咨询
ingest.geoip.downloader.enabled: false


#----------------------- BEGIN SECURITY AUTO CONFIGURATION -----------------------
#
# The following settings, TLS certificates, and keys have been automatically
# generated to configure Elasticsearch security features on 27-03-2022 05:47:36
#
# --------------------------------------------------------------------------------

# Enable security features
# 是否密码登陆,关闭
xpack.security.enabled: false

xpack.security.enrollment.enabled: true

# Enable encryption for HTTP API client connections, such as Kibana, Logstash, and Agents
# 是否开启ssl认证 关闭
xpack.security.http.ssl:
  enabled: false
  keystore.path: certs/http.p12

# Enable encryption and mutual authentication between cluster nodes
# 是否加密通信
xpack.security.transport.ssl:
  enabled: false
  verification_mode: certificate
  keystore.path: certs/transport.p12
  truststore.path: certs/transport.p12
#----------------------- END SECURITY AUTO CONFIGURATION -------------------------
九 启动
[chen@localhost elasticsearch-7.17.1]$ cd /usr/local/elasticsearch-7.17.1/bin/
[chen@localhost bin]$ ./elasticsearch
[root@localhost elasticsearch-7.17.1]# su chen
[chen@localhost elasticsearch-7.17.1]$ cd /usr/local/elasticsearch-7.17.1/bin/
[chen@localhost bin]$ ./elasticsearch
九 测试elasticsearch是否安装成功
[chen@localhost root]$ netstat -ntlp | grep 9200
(Not all processes could be identified, non-owned process info
 will not be shown, you would have to be root to see it all.)
tcp6       0      0 127.0.0.1:9200          :::*                    LISTEN      13508/java
tcp6       0      0 ::1:9200                :::*                    LISTEN      13508/java
[chen@localhost root]$ curl 127.0.0.1:9200
{
  "name" : "localhost.localdomain",
  "cluster_name" : "elasticsearch",
  "cluster_uuid" : "URHDGGANRQ688BY68O7bvQ",
  "version" : {
    "number" : "7.17.1",
    "build_flavor" : "default",
    "build_type" : "tar",
    "build_hash" : "e5acb99f822233d62d6444ce45a4543dc1c8059a",
    "build_date" : "2022-02-23T22:20:54.153567231Z",
    "build_snapshot" : false,
    "lucene_version" : "8.11.1",
    "minimum_wire_compatibility_version" : "6.8.0",
    "minimum_index_compatibility_version" : "6.0.0-beta1"
  },
  "tagline" : "You Know, for Search"
}
浏览器访问:http://192.168.208.128:9200/
{
  "name" : "node-name",
  "cluster_name" : "cluster-name",
  "cluster_uuid" : "URHDGGANRQ688BY68O7bvQ",
  "version" : {
    "number" : "7.17.1",
    "build_flavor" : "default",
    "build_type" : "tar",
    "build_hash" : "e5acb99f822233d62d6444ce45a4543dc1c8059a",
    "build_date" : "2022-02-23T22:20:54.153567231Z",
    "build_snapshot" : false,
    "lucene_version" : "8.11.1",
    "minimum_wire_compatibility_version" : "6.8.0",
    "minimum_index_compatibility_version" : "6.0.0-beta1"
  },
  "tagline" : "You Know, for Search"
}
十 设置密码访问
十一 中文分词器
下载地址(下载.zip包):https://github.com/medcl/elasticsearch-analysis-ik/releases
mkdir /usr/local/elasticsearch-7.17.1/plugins/analysis-ik
mv /usr/local/elasticsearch-analysis-ik-8.1.0.zip /usr/local/elasticsearch-7.17.1/plugins/analysis-ik/
cd /usr/local/elasticsearch-7.17.1/plugins/analysis-ik/
unzip elasticsearch-analysis-ik-8.1.0.zip
 chown -R chen analysis-ik/
kibana安装
一 下载和elasticsearch相同版本的kibana
kibana 下载
二 解压文件
tar -zxvf
三 分配权限
chown -R chen [文件目录]
vi /opt/kibana-7.12.0-linux-x86_64/config/kibana.yml
server.host: 0.0.0.0]
四 关闭防火墙
-
查看运行状态:firewall-
cmd --state
- 关闭防火墙: systemctl stop firewalld
- 开机禁用 : systemctl disable firewalld
- 开启成功,可通过外网访问
五 访问
http://【ip】:5601 出现loading kibana:升级浏览器


六 配置账号和密码
七 开发常用dev tools调用操作elasticsearch

MySQL 5.7 安装
一 下载
wget https://cdn.mysql.com//Downloads/MySQL-5.7/mysql-5.7.18-linux-glibc2.5-x86_64.tar.gz
二 安装
1 检查mariadb
yum list installed | grep mariadb

2 卸载mariadb
yum -y remove mariadb-libs.x86_64

3 安装MySQL
tar  -zxvf  mysql-5.7.18-linux-glibc2.5-x86_64.tar.gz  -C  /usr/local/
mv mysql-5.7.18-linux-glibc2.5-x86_64/ mysql-5.7.18

4 创建数据文件夹 data
在mysql主目录创建data文件夹
mkdir data

5 创建用户执行 mysqld命令
参考地址: https://dev.mysql.com/doc/refman/5.7/en/binary-installation.html
useradd mysql
6 初始化MySQL
在mysql安装bin目录执行,会生成一个临时密码,先拷贝出来;后继第一次登录mysql需要使用
./mysqld --initialize --user=mysql --datadir=/usr/local/mysql-5.7.18/data --basedir=/usr/local/mysql-5.7.18
参数说明:
–initialize 初始化 mysql,创建 mysql 的 root, 随机生成密码。记住密码,登录 msyql 使用。
–user 执行 msyqld 命令的 linux 用户名
–datadir : mysql 数据文件的存放位置,目录位置参照本机的设置。
–basedir : msyql 安装程序的目录,目录位置参照本机的设置。

初始化,拷贝密码 ItSCo#UnR5>Z

7 启用安全功能
服务器和客户端之间通信所有数据加密。使用证书身份证验证机制。开启数据加密功能,生成数字证书
bin目录执行
./mysql_ssl_rsa_setup --datadir=/usr/local/mysql-5.7.18/data

8 修改mysql安装目录的权限

chown -R mysql mysql-5.7.18/

9 启动mysql
bin目录执行 ./mysqld_safe & (&表示后台启动)
./mysqld_safe &
| 确认mysql是否启动,查看进程 ps -ef | grep mysql |

10 客户端进入mysql
bin目录执行 ./mysql -uroot -p
-u 使用root登录,使用第6部生成的密码
-p 使用密码登录
./mysql -uroot -p

11 修改密码
执行sql提示修改密码,语法 alter user ‘用户名’@’主机域名或ip’ identified by ‘新密码’
例如:alter user ‘root’@’localhost’ identified by ‘123456’;
alter user 'root'@'localhost' identified by '123456';

12 修改远程访问
命令 grant
语法 grant all privileges on . to root@’%’ identified by ‘123456’;
参数:
其中. 的第一个表示所有数据库名,第二个表示所有的数据库表;
root@’%’ 中的root表示用户名,%表示ip地址,%也可以指定具体的ip地址,比如
root@localhost,root@192.168.10.129
①执行授权命令
例如:grant all privileges on . to root@’%’ identified by ‘123456’;
②更新权限信息,执行flush刷新权限例如:flush privileges;
grant  all  privileges  on *.* to root@'%'  identified by  '123456';
flush  privileges;

13 测试mysql客户端访问mysql
HeidiSQL:官方网站:https://www.heidisql.com/
Navicat:官方网站:http://www.navicat.com/
SQLyog:官方网站:http://www.webyog.com/
连接错误可能是防火墙开启状态,关闭防火墙
查看防火墙: systemctl status firewalld
让防火墙可用: systemctl enable firewalld
让防火墙不可用:systemctl disable firewalld
开启防火墙:systemctl start firewalld
关闭防火墙:systemctl stop firewalld


14 关闭mysql服务
- 退出客户端
exit

- 关闭mysql服务器
./mysqladmin -uroot -p shutdown
